
Amazon’s Seller Central is a robust interface for sellers to manage the process of selling products directly to Amazon customers, from setting retail pricing to updating inventory, managing orders and payments, and more. Within the Seller Central portal you’ll find the Campaign Manager, a central hub for managing your Amazon advertising campaigns, as well as Advertising Reports, both valuable tools for monitoring your campaign performance and optimizing your campaigns for success.
If you’re a new seller or you’re just getting started with Amazon advertising, this post is for you: We’ll cover everything you need to know about Amazon’s seller analytics tools and how to use them to your advantage.
Campaign Status
The campaign status column is your first stop in the Campaign Manager, allowing you to quickly determine if there are any issues preventing your ads from running. Here, you can do several things:
- Enable a campaign: Restart campaigns that have been paused or have ended by entering a new future end date, or simply select the campaign and click “Restart.”
- Adjust a campaign date: Add a new end date in the future to extend a campaign.
- Stop a campaign: Change a campaign’s end date to today’s date to end a campaign or change the campaign’s status to “Paused” or “Archived.”
There are a variety of campaign status types for Sponsored Products and Sponsored Brands campaigns, which Amazon outlines in this handy chart:
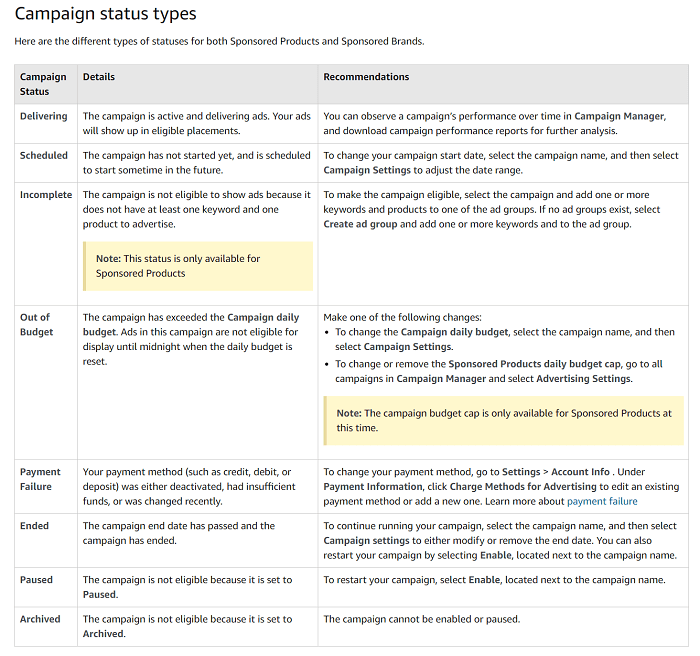
Screenshot via Amazon Seller Central
There are also a few campaign statuses that apply only to Sponsored Brands campaigns:
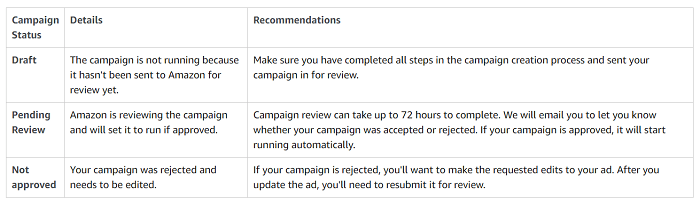
Screenshot via Amazon Seller Central
Checking the campaign status column first allows you to quickly identify any campaigns with problems and take action to address any issues.
Campaign Metrics
To see your advertising metrics, go to Advertising > Campaign Manager and click on the Campaigns tab. Here, you can see a variety of metrics for the time frame you specified for each campaign. The attribution window for Sponsored Products is 7 days, and the window for Sponsored Brands is 14 days. So, any sales made to shoppers who previously clicked on your ad within these windows is included in these metrics:
- Budget: The average amount you’re willing to spend on each campaign per day for Sponsored Products ads. For Sponsored Brands ads, your budget is the maximum lifetime amount you’ve specified for a campaign or the maximum amount you’re willing to spend per day.
- Spend: The actual amount you’ve spent on ads.
- Sales: The total product sales generated from ad clicks for Sponsored Product ads. For Sponsored Brands, the sales metric reflects purchases for your brand’s products following ad clicks – including sales of your brand’s products made by Amazon and other sellers.
- Advertising Cost of Sales (ACoS): ACoS reflects the percentage of sales spent on advertising. To calculate your ACoS, divide your total spend by your total sales.
- Return on Advertising Spend (RoAS): This metric is only available on downloadable reports, but it reflects the return you’ve earned from your advertising investment. To calculate your RoAS, divide your total sales by your total advertising spend.
These tools provide useful insights for optimizing your campaigns. For example, to improve profitability, you want to keep your ACoS as low as possible, so keeping an eye on this data can tell you when it’s time to adjust your bids or your overall budget. You might consider lowering your bid on keywords with a high ACoS, removing them entirely from your campaign, or even adding them to your negative keywords.
Brand Analytics and the Search Terms Report
Brand Analytics is a separate feature within Seller Central that’s only available to sellers who own a brand or a brand’s agent, representative, or manufacturer and are registered on the Brand Registry. You’ll find it under the Reports tab in Seller Central. The most valuable tool here is the search terms report, which includes data on:
- Popular search terms on Amazon during a specified time period
- The frequency rank for those search terms (a number rank representing the search term’s popularity compared to all search terms during a specified time period)
- The top three products customers click on after searching those terms
- Click share for the top three products (clicks on a specific product / total clicks on any product for the same search query)
- Conversion share for the top three products (purchases of a specific product / purchases of any product for the same search query)
To find it, go to Campaigns > Advertising Reports > Search Term Report.
There are two primary ways brands can make use of the search terms report:
- Look up search terms to discover what products customers are clicking on after searching for those terms
- Look up specific products to discover the search terms that are generating clicks for those products
The first use case is a useful competitive analysis strategy, allowing you to find out what products are most appealing to customers searching for particular search terms and analyzing what attracts shoppers to those products, such as a better product description, more intriguing product detail page titles, more images, pricing, etc. Then, you can mimic these tactics to improve your own results. You can also search for your competitors’ products to discover their top-performing search terms and adjust your own keyword targeting to capture a higher share of clicks and conversions.
The second use case is an easy way to find out what searches are driving shoppers to your product detail pages by searching for your own products. Use this data to refine your target keywords and your bidding strategy, such as by increasing your bids for keywords that generate the most clicks or sales.